- Download Solr 4.10.3 from http://lucene.apache.org/solr/downloads.html. Since we are installing on a Windows machine, you will want to get the .zip file version of the download.
- Extract the contents of the .zip to a temporary location of your choice.
- Find the \dist folder in the extracted solr-4.10.3 directory. Rename the solr-4.10.3.war to solr.war and copy the file to the Tomcat’s \webapps folder. The path in my environment was C:\Program Files\Apache Software Foundation\Tomcat 8.0\webapps.
- Create an empty Solr home folder. This will be the permanent place of residence on your machine for your Solr instance. For example, D:\solr is where I put my Solr instance.
- Find the \example\solr folder in the extracted solr-4.10.3 directory. Copy the contents of \example\solr to the empty Solr home folder you just created in step 4.
- Find the \example\lib\ext folder in the extracted solr-4.10.3 directory. Copy the contents of \example\lib\ext to Tomcat’s \lib folder. The path in my environment was C:\Program Files\Apache Software Foundation\Tomcat 8.0\lib.
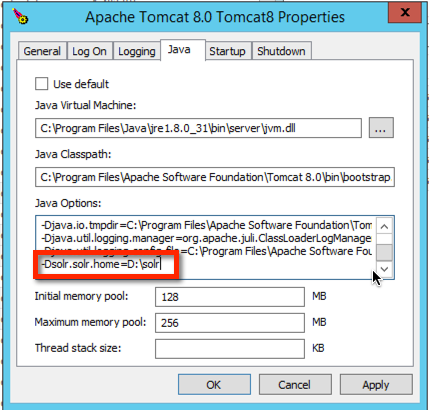
- Set the home directory for Solr in Tomcat. This is done by adding a new Java option with the Monitor Tomcat program. In my case, the option was -Dsolr.solr.home=D:\solr
- Stop/start Tomcat and try browsing to your Solr instance. For example, http://tomcat:8080/solr.

Sitecore 8 + Solr (part 2/3): Install Solr
In part one of this series, I covered the installation of Tomcat. Now we are ready to get an instance of Solr up and running.


0 comments:
Post a Comment