Showing posts with label Sitecore 8. Show all posts

Sunday, April 17, 2016

Sitecore Installer Re-visited

Hard to believe, but it was close to a year ago that I released my Sitecore PowerShell Installer script. Since then I've continued to refine and improve upon it. Now seems like as good a time as any to take stock of the script.

Enhancements 

Installs 8.1 or 8.0

I've added a version checker in the script that uses Reflection to examine the version of the Sitecore.Kernel.dll assembly. This check then forces some behavioral differences during the script's runtime.

Robust Pre-Install Sanity Checking

Roughly 1/4 of the script is dedicated to validating configuration input and environmental health before any changes are made to the server. If I had a time machine, I would go back in time to the day I started the script and add a install counter. It's hard to pin down an accurate estimate of how many times I've used the script to install Sitecore, but I know I would need at least three digits! :)

More Sitecore Roles

Originally, the script was intended for CM/CD installs. Since then I have added more specialized roles like a Preview CD and a Publishing server.

Optionally Disable All Database Operations

Do you have to deal with intransigent DBAs? If, for some reason, you simply cannot allow the script to connect to SQL and write changes, then you can still use the script to automate everything else.

Full Compliance with MongoDB's Connection String Specification

If Mongo allows for it, then so does the script. You can review the specification here.

Multiple Bindings in IIS

This is useful if you are running a multi-site instance or use load-balanced servers and wish to provide dedicated host names/IPs in addition to the load-balanced binding.

Change Default Admin Password

I worked very hard to ensure that servers were properly hardened during install. Yet, somehow, overlooked this basic but necessary change! Of course you could make this change manually, but if you wish to automate the installation of entire server environments this is a simple but important addition to the script.

Role-Based Config File Examples

The installer script's run-time is governed by a .config file that contains all the information needed to install Sitecore. To help people get started using the script, I've created a number of example configuration files according to Sitecore role.

Philosophy of Use

My general approach to managing and customizing Sitecore is through package deployment -- typically .update package. This, in turn, informs how I think about installing Sitecore. As a general rule of thumb, I want to make any system change that I cannot (easily) do through an .update package. I want to configure the server into a standard role that is suitable for smoke testing, but I don't want to turn an installer into an application management solution. This is same basic position I've maintained since I wrote the original version.

What doe this mean in a practical sense? As much as possible, I try to avoid modifying stock .config files. There are a handful of exceptions, some of which I wouldn't have predicted back when I wrote my original blog post. Here are the list of files I do modify depending upon the specifics of the install:

  • web.config
  • DataFolder.config
  • Sitecore.analytics.tracker.config
  • Sitecore.ContentSearch.Solr.DefaultIndexConfiguration.config.example
  • ScalabilitySettings.config
  • Sitecore.Publishing.Parallel.config

In addition, I will enable/disable any number of files depending upon the server role specified. For example, a CD server will have the SwitchMasterToWeb.config file enabled. Furthermore, I will place that file in an appropriate folder (e.g. zzzMustBeLast or Z.SwitchMasterToWeb).

So what are some examples of what I won't do? My script will not 'turn on' Solr. Doing so depends upon having a Solr environment ready to go. I have provided a script to switch between search providers however. I won't create new indexes or new indexing strategies if you provision a Preview CD server, nor will I ensure your indexing strategies are appropriately configured on a CD vs. a CM server. In my opinion, that is the job of some other process such as deploying an .update package that contains the appropriate .config file patches. The job of the install script is to ensure that each server is in a state ready to receive those packages and to eliminate the need to make any system changes outside the domain of an .update package.

Installer Configuration Tour


Future Enhancements

One idea I have is to isolate all sitecore config changes made by the installer to a single patch file. While the list of files that I make changes to today is fairly small, it would be an improvement if I made no modifications at all.

How else could I improve the script? Actually, I'd like to ask you that, dear reader. What would you like to see done, if anything?

Monday, August 10, 2015

Install Sitecore.Ship From NuGet with PowerShell

Download from GitHub.

Now that I have a solution for quickly installing Sitecore in higher environments, I want a way to automate .update package installs. There are a number of clever solutions out there to assist with this. My choice is Sitecore.Ship. The biggest advantage Sitecore.Ship has over other solutions I have seen is the ability to perform remote installations, including sending the package over the wire. Great stuff!

The stumbling block for me, and possibly others, is that Sitecore.Ship isn't very easy to install. The typical technique is to use NuGet to introduce Sitecore.Ship into Visual Studio, and include it in your custom solution's deployment workstream. But...this is a chicken-and-egg problem for me. I want Sitecore.Ship installed from day one, because it is a building block of my deployment workstream not my custom solution!

PowerShell To The Rescue

Given my experience with PowerShell to install Sitecore my thought process was, "If PowerShell can install Sitecore, surely it can install Sitecore.Ship." (Yes, it surely can.) I've created a script that will consume one or more NuGet feeds to:

  1. Download Sitecore.Ship
  2. Recursively download dependent packages
  3. Create a web.config transform from Sitecore.Ship's NuGet packages and your chosen options
  4. Install assemblies and apply config files
  5. Write to an (optional) log file

NuGet And You

As of this writing, if you want to use Sitecore.Ship with Sitecore 8 then you need version 0.4.0 of the Sitecore.Ship NuGet package. Unfortunately, this package isn't yet available on nuget.org. I downloaded the development branch of Sitecore.Ship from GitHub and built a NuGet package with Sitecore 8 update 4 assemblies. I published this NuGet package to Arke's private feed, so if you are an Arke employee, lucky you! If not, I've included the package in my GitHub repository to save you, dear reader, the trouble of generating the NuGet package. In any event, I expect that a public release of Sitecore.Ship 0.4.0+ will be available soon.

The script supports basic authentication should you choose to host Sitecore.Ship or any dependent packages on a private feed. The script also supports search across multiple feeds. Thus, you could host a private build of Sitecore.Ship on a private feed, but pull dependent packages from public feed(s).

Version Testing

I've tested the install script against all versions of Sitecore 8 (initial release through update 4.) I've not tried the script with earlier versions of Sitecore, though I suspect it would mostly work. Depending upon demand or my own needs I may extend it to support earlier versions of Sitecore/Sitecore.Ship.

Happy deployments!

Monday, July 6, 2015

PowerShell Sitecore Install Script

Update (4-17-2016): Here I discuss enhancements I've made to the script since last year as well as a video tour of the config file used by the script.


Download from GitHub.

I've been searching for a solution to automating Sitecore installations in any environment higher than my personal development VM--for that we already have SIM. I can be stubborn and exacting, sometimes to a fault, and while a manual install affords me complete control over an environment, it also is horribly time-consuming. Also, if I'm being honest with myself (I'm sure this plainly obvious to you) this process is mistake-prone.

Search for a Solution

The following are the three most prominent examples of existing solutions I looked at, but I looked at many more.

Sitecore Instance Manager

I've been using SIM for a while now to manage my Sitecore instances on my development box. It's a wonderful solution, but it's not suitable for a production environment without a lot of post-install intervention. I also looked at the console app for SIM. Alas, while it seems to extend SIM to the command-line, it does not allow for greater flexibility in how SIM installs a Sitecore instance.

Sitecore's Installer

Jeremy Davis had the very clever idea of deconstructing Sitecore's .exe installer to get at the underlying .msi file. He successfully identified all of the command-line switches the .msi accepts. I very nearly settled on this approach. After all, one would expect Sitecore's own installer to follow Sitecore's installation guideline's recommendations. It does a better job than SIM, but you are also rather constrained in some of your options and that was a deal breaker for me.

PowerShell Script

All-star Alex Shyba wrote a PowerShell script to automate his installs. His use case is the same as mine for SIM, however: he built the script to install development instances. Like the previous solutions discussed, concerns such as file system permissions, user mappings in SQL, using a domain account for the application pool identity, and CD-hardening are left as post-install exercises for a human.

Inspiration

Alex's script gave me the push I needed to write my own. My goal is to completely automate a production-ready Sitecore CM or CD server install. Once you run my script the only thing left to do is install your desired modules. Actually, let's take a minute to unpack that, because buried inside that sentence is a subtle point on my deployment philosophy, and it impacts the way I designed my Sitecore installer. I believe that any Sitecore change that can be managed through a .update package (or .zip module) should. For me, this includes managing changes like SwitchMasterToWeb, scalability, and web.config amongst many others. Thus, my over-arching design philosophy for an automated install is to do everything I would normally in SQL, IIS, the file system, and (yes...) the .config files but only enough to create a working instance and no more. Once the installer is done, the instance should be 100% ready for management via .update packages. That is my goal.

The Solution

I decided to make my script available on GitHub for a couple reasons.
  • I suspect and hope other will want to make use of it
  • Community feedback will help me improve it

Major Features

  • Install Sitecore with or without the databases.
  • Script sanity checks SQL and input validation prior to making any changes
  • Write output to the screen and to a log file.
  • Fine-grained control of the application pool identity (built-in or domain account)
  • Assign recommended file system permissions on web server.
  • Add application pool identity to recommended local groups on web server.
  • Create user mappings for login in SQL.
  • Install database files on any valid path or UNC
  • SQL Login used during install doesn't have to be the same account executing the script.
  • May specifiy a host name and port used for MongoDB
  • May supply a Solr base address
  • Choose to use SQL as a session state server
  • Many CD-hardening options

One limitation of the script today is I do not support choosing MongoDB as a session state server. My suspicion is that this would be a very easy change to make, and I will be including it soon. The script is strictly limited to automating the Sitecore install itself, not MongoDB or Solr. While it's not necessary, it would be a good idea to provisions those applications first if you plan to use them. Speaking of Solr, if you do plan to use it, then be sure to check out my other PowerShell script to change the search provider from Lucene to Solr.

Finally, I built this script to install Sitecore 8.0. I've briefly tested it with Sitecore 7.5 and it mostly works, but breaks on some assumptions about the existence of .config files like SwitchMasterToWeb.config.example and Sitecore.ContentSearch.Solr.DefaultIndexConfiguration.config.example. Even earlier versions of Sitecore would need some more adjustments (example: deal with with differences in databases.) Depending upon the level of interest expressed I will consider making the script compatible with prior Sitecore releases.

Monday, April 27, 2015

SwitchMasterToWeb Woes

Scenario: You are using Sitecore 8—I think this also applies to 7.5—and have enabled the SwitchMasterToWeb.config. You now see see an exception related to 'master' database. For example:

  • Could not find configuration node: contentSearch/indexConfigurations/indexUpdateStrategies/syncMaster


Cause: Sitecore patches files found in the \Include folder first and then recursively patches all files found in sub-folders of \Include. In all cases, Sitecore follows alphabetical order when deciding which folder or file to examine next. This means that the SwitchMasterToWeb.config file placed in \Include will be merged before config files found in sub-folders. Some of those config files are for indexes and those index try to use the syncMaster strategy.

Resolution: Place the SwitchMasterToWeb.config file in a sub-folder like "zzzMustBeLast" and reload your site!

Saturday, March 28, 2015

On Second(ary) Thought...

Recently I posted my thoughts regarding the proper ratio of Solr cores to Sitecore indexes. In it, I mentioned the need to double the number of cores to support the SwitchOnRebuildSolrSearchIndex feature. It turns out, this isn't quite right. Creating a secondary core for the analytics index does no good and should be avoided.

You'll want to avoid a secondary core for the analytics index because trying to use one results in exception. The analytics index has an extra "group" parameter, and Sitecore cannot find a matching constructor. The SolrSearchIndex class allows for the group parameter but the SwitchOnRebuildSolrSearchIndex does not.

Why is this? As Adam Conn explains, the types of crawlers responsible for maintaining the analytics index are observers of data. This means that the crawler is notified when data is available and then passed that data. Therefore, rebuilding the analytics index would result in an empty index unless you rebuild the reporting database so that the analytics crawlers may observe (and index) the data. This is the reason why the UI doesn't provide the option of rebuilding the analytics index.

Tuesday, March 24, 2015

Solr + Glass = Castle Windsor Crashers?

(I know the title isn't technically true...don't judge me!)

I think it's safe to say most of us Sitecore developers are using some form of ORM these days, right? ...Right? :)

Of course you are, and – most likely – that means you are using Glass Mapper. Probably, you are also using Castle Windsor as your choice of Inversion of Control. You could use some other IoC, but there's a NuGet package that makes incorporating Castle Windsor + Glass into your Visual Studio solution quite easy.

So what if you read my series on Solr and were inspired to use it for Sitecore? Solr also requires an IoC. As I mentioned here, you may choose from Castle Windsor, AutoFac, Ninject, StructureMap, and Unity. It seems only natural to stick with the same IoC as Glass. Common sense says don't add more moving parts than necessary.

And this is why common sense isn't always common or sensible. The moment you deploy your Glass dependent (and thus Castle Windsor dependent) code to your Sitecore instance, you are going to be treated to some ugly YSODs. The issue is that Glass wants to use a higher version of Castle Windsor (3.2) than your Solr-enabled Sitecore instance; it wants version 3.1.

Luckily the fix is relatively painless. We are going to instruct .NET to redirect bindings of earlier versions of Castle.Core and Castle.Windsor to our later version. All you need to do is add the following section to your web.config:

Saturday, March 7, 2015

Friday, March 6, 2015

A Solr Core-nucopia?

[N.B.: If you haven't already, check out my series of posts (1, 2, and 3) that walk through installing Solr for Sitecore.]

Given that there isn't yet a search scaling guide for Sitecore 8.0, the current, best authoritative source of guidance is the Sitecore Search Scaling Guide for 7.5. There is an interesting line in the guide that recommends creating "separate cores for each Sitecore index." This was necessary to avoid inconsistent and unexpected results.

While digging through the release notes for Sitecore 8 update 1 I found a good, technical description of the risk:

When two indexes were configured to use the same SOLR core, it was impossible to differentiate the index data between the indexes. As a result, index data related in one index would override the index data in the other index. This has been fixed so that the _uniqueid index field value has been extended with information about the index name. (426743)

Out of curiosity I decided to validate the fix. Here is a query from one of my Solr cores connected to a Sitecore 8 update 2 instance (a big thumbs-up to Solr's built-in admin tool!)


Let's breakdown the taxonomy of this _uniqueid:

  1. sitecore://<database name>/<item id>?lang=<language name>&ver=<version number>&ndx=<index name>

Clearly, the index name is now a part of the key! Does this mean you can disregard the advice in the Search Scaling Guide? In a word, yes. A more important question is, "Should you?" Well, probably not. Here are some reasons why:

  1. Any single Sitecore index (Solr core) rebuild is less expensive since there is less data. Thus, the rebuild is quicker.
  2. When reviewing statistics about a core in Solr's core admin, facts about the core such as the number of documents easily translate to facts about the Sitecore index.
  3. Probably most important of all, it's possible to tune the cache and core's settings as necessary per Sitecore index. Undoubtedly, usage patterns will vary per Sitecore index. So should the strategies you implement to tune the Solr core responsible for that Sitecore index.

Update (3-8-2015): In Sitecore update 2, one Solr core was removed and two were added. I updated the paragraph below to reflect this.

Keep in mind, these advantages do come at a cost. There will be some amount of overhead incurred per core. Also, there is the management headache of maintaining many cores. As of Sitecore 8 update 2 there are 13 indexes for a vanilla install. If you want to take advantage of the SwitchOnRebuildSolrSearchIndex feature (while an index rebuilds, Sitecore can still return search results for that index) then you will need to add an additional core for each Sitecore index that uses this feature. That is a possible 26 25 (see here for an explanation why the total number changed) cores to manage!

I'm interested in other people's opinions on this topic. Let me know what you all think.

Saturday, February 28, 2015

Sitecore 8 + Solr (part 3/3): Configur-ageddon

So far in this series we have installed Tomcat and Solr. Hopefully it has been a relatively easy process. Unfortunately, I can't promise today's post will be as easy. I've tried to balance making the configuration process as pain-free as possible, while not shielding anyone from the details that tripped me up. My goal is to take (all?) the guesswork out of this process. Let me know how I did!

[N.B.: As I was finishing up this final post I saw that update 2 for Sitecore was released. A quick perusal of the release notes leaves me feeling fairly confident that these instructions -- created with Sitecore 8 update 1 in mind -- should still be valid for update 2. No doubt I will soon need to upgrade my Sitecore environments to update 2 in the near future. Rest assured any issue(s) I encounter I will document here.]

Update (3-3-2015, 3-8-2015): As promised, I have updated this guide to comply with Sitecore 8 update 2. This means that if you want to upgrade from update 1, then you will need to create a couple of new cores and delete an old one (see step 6) and replace a DLL (see step 9). If you are starting fresh from update 2, then don't worry about any of this and dive right in!


  1. Stop the Tomcat service.
  2. Go to the root of your Solr instance, in my case, D:\solr. We need to modify the "collection1" directory to serve as one of the cores (folders with config files and index data) required by Sitecore.
    1. Rename the folder to "sitecore_analytics_index"
    2. Inside the folder you will find a file called “core.properties” which you may edit with a text editor. You need to change the “name” value to the name of your core. For example, when I create the “sitecore_analytics_index” core, then I will edit the “core.properties” file to have the value name=sitecore_analytics_index


  3. Start the Tomcat service and visit the Solr administration page. You may need to reload your browser page if it was already up. Click on the “Core Admin” menu item. If you modified the old “collection1” core correctly you should now see a sitecore_analytics_index core.


  4. Stop the Tomcat service. Now we need to fix the schema of our “sitecore_analytics_index” core, otherwise Sitecore cannot parse the xml correctly. Edit the file at \sitecore_analytics_index\conf\schema.xml according to Sitecore’s knowledge base article: https://kb.sitecore.net/articles/227897. Don’t forget to define the field type for pint since we are using a version of Solr later than 4.9! Start Tomcat and reload the Core Admin page.
  5. Next we must generate a new, Sitecore-specific schema. Sitecore provides a tool for this. Navigate to the Control Panel of your Sitecore instance. Look for the “Generate the Solr Schema.xml file” link and click it. Provide a path for the source and target files (they can’t be the same file.) Once you have generated your new schema, replace the old schema with it. Restart the Tomcat service and make sure the core loads correctly.
  6. A vanilla install of Sitecore 8 update 2 requires 13 cores to work correctly. So far we have one, but don’t despair, now that we have a generated a schema this process is much easier.  Essentially, we are going to use our sitecore_analytics_index core as a template to create the others. To do this:
    1. Copy the sitecore_analytics_index folder.
    2. Repeat steps 2a and 2b for each copy.
    3. When you are done, your Solr home folder should contain the following cores


    4. If you have done everything correctly you should be able to restart Tomcat and see all the cores listed above on the Core Admin page.
  7. Update (3-7-2015): I decided to create a PowerShell shortcut for this step. Save yourself time!

    Still with me? Hang in there, we are halfway home! Next, we must tell Sitecore to start using Solr instead of Lucene. This is done by appending or removing “disabled” as an extension of a configuration file’s name.
    1. Config files to DISABLE:

      \App_Config\Include\Sitecore.ContentSearch.Lucene.DefaultConfigurations.config.disabled
      \App_Config\Include\Sitecore.ContentSearch.Lucene.Index.Analytics.config.disabled
      \App_Config\Include\Sitecore.ContentSearch.Lucene.Index.Core.config.disabled
      \App_Config\Include\Sitecore.ContentSearch.Lucene.Index.Master.config.disabled
      \App_Config\Include\Sitecore.ContentSearch.Lucene.Index.Web.config.disabled
      \App_Config\Include\Sitecore.ContentSearch.Lucene.Indexes.Sharded.Core.config.example (left as is)
      \App_Config\Include\Sitecore.ContentSearch.Lucene.Indexes.Sharded.Master.config.example (left as is)
      \App_Config\Include\Sitecore.ContentSearch.Lucene.Indexes.Sharded.Web.config.example (left as is)
      \App_Config\Include\Sitecore.Marketing.Definitions.MarketingAssets.Repositories.Lucene.Index.Master.config.disabled
      \App_Config\Include\Sitecore.Marketing.Definitions.MarketingAssets.Repositories.Lucene.Index.Web.config.disabled
      \App_Config\Include\Sitecore.Marketing.Definitions.MarketingAssets.Repositories.Lucene.IndexConfiguration.config.disabled
      \App_Config\Include\ContentTesting\Sitecore.ContentTesting.Lucene.IndexConfiguration.config.disabled
      \App_Config\Include\FXM\Sitecore.FXM.Lucene.Index.DomainsSearch.config.disabled
      \App_Config\Include\ListManagement\Sitecore.ListManagement.Lucene.Index.List.config.disabled
      \App_Config\Include\ListManagement\Sitecore.ListManagement.Lucene.IndexConfiguration.config.disabled
      \App_Config\Include\Social\Sitecore.Social.Lucene.Index.Master.config.disabled
      \App_Config\Include\Social\Sitecore.Social.Lucene.Index.Web.config.disabled
      \App_Config\Include\Social\Sitecore.Social.Lucene.IndexConfiguration.config.disabled


    2. Config files to ENABLE:

      \App_Config\Include\Sitecore.ContentSearch.Solr.DefaultIndexConfiguration.config
      \App_Config\Include\Sitecore.ContentSearch.Solr.Index.Analytics.config
      \App_Config\Include\Sitecore.ContentSearch.Solr.Index.Core.config
      \App_Config\Include\Sitecore.ContentSearch.Solr.Index.Master.config
      \App_Config\Include\Sitecore.ContentSearch.Solr.Index.Web.config
      \App_Config\Include\Sitecore.Marketing.Definitions.MarketingAssets.Repositories.Solr.Index.Master.config
      \App_Config\Include\Sitecore.Marketing.Definitions.MarketingAssets.Repositories.Solr.Index.Web.config
      \App_Config\Include\Sitecore.Marketing.Definitions.MarketingAssets.Repositories.Solr.IndexConfiguration.config
      \App_Config\Include\ContentTesting\Sitecore.ContentTesting.Solr.IndexConfiguration.config
      \App_Config\Include\FXM\Sitecore.FXM.Solr.Index.DomainsSearch.config
      \App_Config\Include\ListManagement\Sitecore.ListManagement.Solr.Index.List.config
      \App_Config\Include\ListManagement\Sitecore.ListManagement.Solr.IndexConfiguration.config
      \App_Config\Include\Social\Sitecore.Social.Solr.Index.Master.config
      \App_Config\Include\Social\Sitecore.Social.Solr.Index.Web.config
      \App_Config\Include\Social\Sitecore.Social.Solr.IndexConfiguration.config


  8. So I know that last step was pretty tedious, but if you've made it this far then the rest will be easier. Download the Solr Support Package from Sitecore and extract the contents of the zip file.
  9. Copy the following DLLs from the Solr Support Package into the \bin folder of your Sitecore Instance [N.B.: Castle Windsor is my Inversion of Control preference as Glass also uses it. Aside from Castle Windsor, Sitecore supports AutoFac, Ninject, StructureMap, and Unity.]:

    • Castle.Facilities.SolrNetIntegration.dll
    • Microsoft.Practices.ServiceLocation.dll
    • Sitecore.ContentSearch.Linq.Solr.dll
    • Sitecore.ContentSearch.SolrProvider.CastleWindsorIntegration.dll
    • Sitecore.ContentSearch.SolrProvider.dll
    • SolrNet.dll

      Update (3-3-2015): If you are upgrading from Sitecore 8 update 1, then you only need to replace Sitecore.ContentSearch.SolrProvider.XXXXXIntegration.dll with the latest version from the Solr Support Package. All other DLLs remain unchanged.

  10. Download the Nuget package for Castle Windsor. Unzip the package by renaming the extension from .nupkg to .zip and extracting its contents. Copy the Castle.Windsor.dll from \lib\net40-client to the \bin folder of your Sitecore instance.
  11. Repeat step 10 for the Castle.Core Nuget package. Copy the Castle.Core.dll from \lib\net40-client to the \bin folder of your Sitecore instance.
  12. Since we are going to use IoC, we need to make our Sitecore instance aware of it by replacing the Application directive in the global.asax file with the following:

    <%@Application Language='C#' Inherits="Sitecore.ContentSearch.SolrProvider.CastleWindsorIntegration.WindsorApplication" %>

  13. In order for Sitecore to talk to Solr, we need to give it a URL. This setting is maintained in the Sitecore.ContentSearch.Solr.DefaultIndexConfiguration.config file (remember, your address may differ from mine):

    <setting name="ContentSearch.Solr.ServiceBaseAddress" value="http://tomcat:8080/solr" />

  14. SOOO CLOSE! At this point, you are ready to test how badly you have broken your Sitecore instance! With any luck, when you browse to your Sitecore site you won't encounter any yellow screens of death. If you see a YSOD complaining about "Connection error to search provider [Solr] : Unable to connect to [http://tomcat:8080/solr]" then you are likely either missing a core or made typo when creating one. Assuming you are error free, the final step is to re-index. Go to the Control Panel and look for the "Indexing manager" link. Select all indexes and click the "Rebuild" button.
  15. Drink a beer; you deserve it!

Friday, February 27, 2015

Sitecore 8 + Solr (part 2/3): Install Solr

In part one of this series, I covered the installation of Tomcat. Now we are ready to get an instance of Solr up and running.

  1. Download Solr 4.10.3 from http://lucene.apache.org/solr/downloads.html. Since we are installing on a Windows machine, you will want to get the .zip file version of the download.
  2. Extract the contents of the .zip to a temporary location of your choice.
  3. Find the \dist folder in the extracted solr-4.10.3 directory. Rename the solr-4.10.3.war to solr.war and copy the file to the Tomcat’s \webapps folder. The path in my environment was C:\Program Files\Apache Software Foundation\Tomcat 8.0\webapps.
  4. Create an empty Solr home folder. This will be the permanent place of residence on your machine for your Solr instance. For example, D:\solr is where I put my Solr instance.
  5. Find the \example\solr folder in the extracted solr-4.10.3 directory. Copy the contents of \example\solr to the empty Solr home folder you just created in step 4.
  6. Find the \example\lib\ext folder in the extracted solr-4.10.3 directory. Copy the contents of \example\lib\ext to Tomcat’s \lib folder. The path in my environment was C:\Program Files\Apache Software Foundation\Tomcat 8.0\lib.
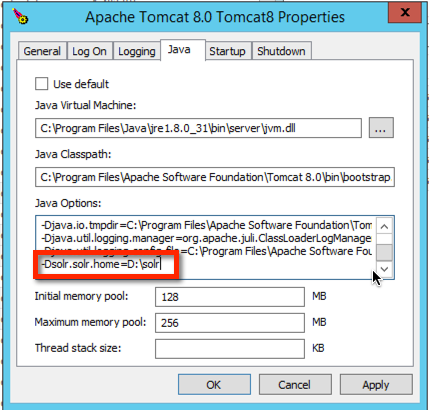
  7. Set the home directory for Solr in Tomcat. This is done by adding a new Java option with the Monitor Tomcat program. In my case, the option was -Dsolr.solr.home=D:\solr


  8. Stop/start Tomcat and try browsing to your Solr instance. For example, http://tomcat:8080/solr.


In the third and final post of this series I'll show you how to get Sitecore and your shiny, new Solr instance working together.

Thursday, February 26, 2015

Sitecore 8 + Solr (part 1/3): Install Tomcat

This is part one of a three-part series intended to guide you step-by-step through the process of making Sitecore 8 and Solr work together. There are some good resources on the Internet, but none of them are a soup-to-nuts walkthrough, and unfortunately there are many pitfalls along the way especially if you are unfamiliar with tools like Apache Tomcat or Solr -- even if you are, the current state of Sitecore's documentation for working with Solr isn't complete for Sitecore 8. I'm sure that will change soon! :)

So, in this first post our goal is to get Apache Tomcat running on a Windows machine installed as a Windows service. Onwards!

  1. Since Solr and Tomcat both require the Java Runtime Environment (JRE) to run, we'll need to start with installing the correct JRE for our machine. This guide uses jre-8u31-windows-x64.exe.
  2. Download and install the Windows Service Installer for Tomcat. This guide uses version 8.0.18 of Tomcat, but you can safely use a more recent version. There are a few decisions to make with the installation wizard. You may choose to install the Host Manager component; this will expose a host manager gui to Tomcat’s built-in administration page.


  3. The default port used by Tomcat is 8080 (used to be 8983) but you may elect to use some other port. Don’t choose port 80 unless you are prepared to tinker with IIS to re-route requests meant for Tomcat to Tomcat; it’s not really worth the effort. Nevertheless, here is a link to a helpful resource: https://confluence.atlassian.com/display/JIRA/Integrating+JIRA+with+IIS.


    If you do not supply an optional user name and password, then you will need to manually edit the conf/tomcat-users.xml file (found under the Tomcat install path) in order to manage Tomcat from the built-in administrative web site. If you do find yourself editing the tomcat-users.xml file, don’t forget to stop-restart Tomcat for those changes to take effect. You can do this with the Monitor Tomcat tool:


  4. Test the Tomcat installation by pointing your browser to http://localhost:8080 assuming that you used port 8080 as your HTTP Connector Port.


  5. By default, the Tomcat Windows service startup type is “Manual.” This means that after rebooting your machine you will need to remember to manually restart the Tomcat service. Change the Tomcat Windows Service startup to “Automatic.”


  6. As a final, optional step, you might elect to add an alias to Tomcat so that the website can be accessed using something other than localhost. For example, you could add the tag <Alias>tomcat</Alias> to the conf/server.xml file. Don't forget—if you use an alias then make sure you either update your DNS server to use that alias or edit your hosts file in Windows. :)


At this point you should have a working Tomcat installation that will be available even after a reboot of your machine. In the next post of this series we will tackle installing Solr on top of Tomcat.