So far in this series we have installed Tomcat and Solr. Hopefully it has been a relatively easy process. Unfortunately, I can't promise today's post will be as easy. I've tried to balance making the configuration process as pain-free as possible, while not shielding anyone from the details that tripped me up. My goal is to take (all?) the guesswork out of this process. Let me know how I did!
[N.B.: As I was finishing up this final post I saw that update 2 for Sitecore was released. A quick perusal of the release notes leaves me feeling fairly confident that these instructions -- created with Sitecore 8 update 1 in mind -- should still be valid for update 2. No doubt I will soon need to upgrade my Sitecore environments to update 2 in the near future. Rest assured any issue(s) I encounter I will document here.]
Update (3-3-2015, 3-8-2015): As promised, I have updated this guide to comply with Sitecore 8 update 2. This means that if you want to upgrade from update 1, then you will need to create a couple of new cores and delete an old one (see step 6) and replace a DLL (see step 9). If you are starting fresh from update 2, then don't worry about any of this and dive right in!
- Stop the Tomcat service.
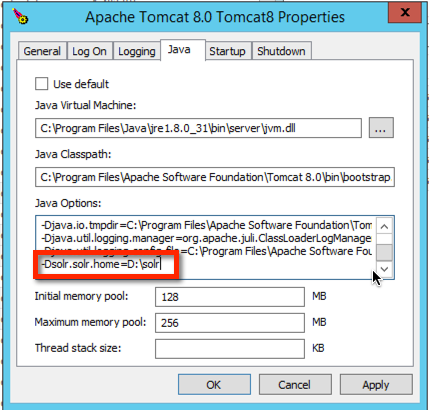
- Go to the root of your Solr instance, in my case, D:\solr. We need to modify the "collection1" directory to serve as one of the cores (folders with config files and index data) required by Sitecore.
- Rename the folder to "sitecore_analytics_index"
- Inside the folder you will find a file called “core.properties” which you may edit with a text editor. You need to change the “name” value to the name of your core. For example, when I create the “sitecore_analytics_index” core, then I will edit the “core.properties” file to have the value name=sitecore_analytics_index

-
Start the Tomcat service and visit the Solr administration page. You may need to reload your browser page if it was already up. Click on the “Core Admin” menu item. If you modified the old “collection1” core correctly you should now see a sitecore_analytics_index core.

- Stop the Tomcat service. Now we need to fix the schema of our “sitecore_analytics_index” core, otherwise Sitecore cannot parse the xml correctly. Edit the file at \sitecore_analytics_index\conf\schema.xml according to Sitecore’s knowledge base article: https://kb.sitecore.net/articles/227897. Don’t forget to define the field type for pint since we are using a version of Solr later than 4.9! Start Tomcat and reload the Core Admin page.
- Next we must generate a new, Sitecore-specific schema. Sitecore provides a tool for this. Navigate to the Control Panel of your Sitecore instance. Look for the “Generate the Solr Schema.xml file” link and click it. Provide a path for the source and target files (they can’t be the same file.) Once you have generated your new schema, replace the old schema with it. Restart the Tomcat service and make sure the core loads correctly.
- A vanilla install of Sitecore 8 update 2 requires 13 cores to work correctly. So far we have one, but don’t despair, now that we have a generated a schema this process is much easier. Essentially, we are going to use our sitecore_analytics_index core as a template to create the others. To do this:
- Copy the sitecore_analytics_index folder.
- Repeat steps 2a and 2b for each copy.
- When you are done, your Solr home folder should contain the following cores

- If you have done everything correctly you should be able to restart Tomcat and see all the cores listed above on the Core Admin page.
- Update (3-7-2015): I decided to create a PowerShell shortcut for this step. Save yourself time!
Still with me? Hang in there, we are halfway home! Next, we must tell Sitecore to start using Solr instead of Lucene. This is done by appending or removing “disabled” as an extension of a configuration file’s name. - Config files to DISABLE:
\App_Config\Include\Sitecore.ContentSearch.Lucene.DefaultConfigurations.config.disabled
\App_Config\Include\Sitecore.ContentSearch.Lucene.Index.Analytics.config.disabled
\App_Config\Include\Sitecore.ContentSearch.Lucene.Index.Core.config.disabled
\App_Config\Include\Sitecore.ContentSearch.Lucene.Index.Master.config.disabled
\App_Config\Include\Sitecore.ContentSearch.Lucene.Index.Web.config.disabled
\App_Config\Include\Sitecore.ContentSearch.Lucene.Indexes.Sharded.Core.config.example (left as is)
\App_Config\Include\Sitecore.ContentSearch.Lucene.Indexes.Sharded.Master.config.example (left as is)
\App_Config\Include\Sitecore.ContentSearch.Lucene.Indexes.Sharded.Web.config.example (left as is)
\App_Config\Include\Sitecore.Marketing.Definitions.MarketingAssets.Repositories.Lucene.Index.Master.config.disabled
\App_Config\Include\Sitecore.Marketing.Definitions.MarketingAssets.Repositories.Lucene.Index.Web.config.disabled
\App_Config\Include\Sitecore.Marketing.Definitions.MarketingAssets.Repositories.Lucene.IndexConfiguration.config.disabled
\App_Config\Include\ContentTesting\Sitecore.ContentTesting.Lucene.IndexConfiguration.config.disabled
\App_Config\Include\FXM\Sitecore.FXM.Lucene.Index.DomainsSearch.config.disabled
\App_Config\Include\ListManagement\Sitecore.ListManagement.Lucene.Index.List.config.disabled
\App_Config\Include\ListManagement\Sitecore.ListManagement.Lucene.IndexConfiguration.config.disabled
\App_Config\Include\Social\Sitecore.Social.Lucene.Index.Master.config.disabled
\App_Config\Include\Social\Sitecore.Social.Lucene.Index.Web.config.disabled
\App_Config\Include\Social\Sitecore.Social.Lucene.IndexConfiguration.config.disabled
- Config files to ENABLE:
\App_Config\Include\Sitecore.ContentSearch.Solr.DefaultIndexConfiguration.config
\App_Config\Include\Sitecore.ContentSearch.Solr.Index.Analytics.config
\App_Config\Include\Sitecore.ContentSearch.Solr.Index.Core.config
\App_Config\Include\Sitecore.ContentSearch.Solr.Index.Master.config
\App_Config\Include\Sitecore.ContentSearch.Solr.Index.Web.config
\App_Config\Include\Sitecore.Marketing.Definitions.MarketingAssets.Repositories.Solr.Index.Master.config
\App_Config\Include\Sitecore.Marketing.Definitions.MarketingAssets.Repositories.Solr.Index.Web.config
\App_Config\Include\Sitecore.Marketing.Definitions.MarketingAssets.Repositories.Solr.IndexConfiguration.config
\App_Config\Include\ContentTesting\Sitecore.ContentTesting.Solr.IndexConfiguration.config
\App_Config\Include\FXM\Sitecore.FXM.Solr.Index.DomainsSearch.config
\App_Config\Include\ListManagement\Sitecore.ListManagement.Solr.Index.List.config
\App_Config\Include\ListManagement\Sitecore.ListManagement.Solr.IndexConfiguration.config
\App_Config\Include\Social\Sitecore.Social.Solr.Index.Master.config
\App_Config\Include\Social\Sitecore.Social.Solr.Index.Web.config
\App_Config\Include\Social\Sitecore.Social.Solr.IndexConfiguration.config
- So I know that last step was pretty tedious, but if you've made it this far then the rest will be easier. Download the Solr Support Package from Sitecore and extract the contents of the zip file.
- Copy the following DLLs from the Solr Support Package into the \bin folder of your Sitecore Instance [N.B.: Castle Windsor is my Inversion of Control preference as Glass also uses it. Aside from Castle Windsor, Sitecore supports AutoFac, Ninject, StructureMap, and Unity.]:
- Castle.Facilities.SolrNetIntegration.dll
- Microsoft.Practices.ServiceLocation.dll
- Sitecore.ContentSearch.Linq.Solr.dll
- Sitecore.ContentSearch.SolrProvider.CastleWindsorIntegration.dll
- Sitecore.ContentSearch.SolrProvider.dll
- SolrNet.dll
Update (3-3-2015): If you are upgrading from Sitecore 8 update 1, then you only need to replace Sitecore.ContentSearch.SolrProvider.XXXXXIntegration.dll with the latest version from the Solr Support Package. All other DLLs remain unchanged. - Download the Nuget package for Castle Windsor. Unzip the package by renaming the extension from .nupkg to .zip and extracting its contents. Copy the Castle.Windsor.dll from \lib\net40-client to the \bin folder of your Sitecore instance.
- Repeat step 10 for the Castle.Core Nuget package. Copy the Castle.Core.dll from \lib\net40-client to the \bin folder of your Sitecore instance.
- Since we are going to use IoC, we need to make our Sitecore instance aware of it by replacing the Application directive in the global.asax file with the following:
<%@Application Language='C#' Inherits="Sitecore.ContentSearch.SolrProvider.CastleWindsorIntegration.WindsorApplication" %>
- In order for Sitecore to talk to Solr, we need to give it a URL. This setting is maintained in the Sitecore.ContentSearch.Solr.DefaultIndexConfiguration.config file (remember, your address may differ from mine):
<setting name="ContentSearch.Solr.ServiceBaseAddress" value="http://tomcat:8080/solr" />
- SOOO CLOSE! At this point, you are ready to test how badly you have broken your Sitecore instance! With any luck, when you browse to your Sitecore site you won't encounter any yellow screens of death. If you see a YSOD complaining about "Connection error to search provider [Solr] : Unable to connect to [http://tomcat:8080/solr]" then you are likely either missing a core or made typo when creating one. Assuming you are error free, the final step is to re-index. Go to the Control Panel and look for the "Indexing manager" link. Select all indexes and click the "Rebuild" button.
- Drink a beer; you deserve it!