Monday, August 10, 2015

Install Sitecore.Ship From NuGet with PowerShell

Download from GitHub.

Now that I have a solution for quickly installing Sitecore in higher environments, I want a way to automate .update package installs. There are a number of clever solutions out there to assist with this. My choice is Sitecore.Ship. The biggest advantage Sitecore.Ship has over other solutions I have seen is the ability to perform remote installations, including sending the package over the wire. Great stuff!

The stumbling block for me, and possibly others, is that Sitecore.Ship isn't very easy to install. The typical technique is to use NuGet to introduce Sitecore.Ship into Visual Studio, and include it in your custom solution's deployment workstream. But...this is a chicken-and-egg problem for me. I want Sitecore.Ship installed from day one, because it is a building block of my deployment workstream not my custom solution!

PowerShell To The Rescue

Given my experience with PowerShell to install Sitecore my thought process was, "If PowerShell can install Sitecore, surely it can install Sitecore.Ship." (Yes, it surely can.) I've created a script that will consume one or more NuGet feeds to:

  1. Download Sitecore.Ship
  2. Recursively download dependent packages
  3. Create a web.config transform from Sitecore.Ship's NuGet packages and your chosen options
  4. Install assemblies and apply config files
  5. Write to an (optional) log file

NuGet And You

As of this writing, if you want to use Sitecore.Ship with Sitecore 8 then you need version 0.4.0 of the Sitecore.Ship NuGet package. Unfortunately, this package isn't yet available on nuget.org. I downloaded the development branch of Sitecore.Ship from GitHub and built a NuGet package with Sitecore 8 update 4 assemblies. I published this NuGet package to Arke's private feed, so if you are an Arke employee, lucky you! If not, I've included the package in my GitHub repository to save you, dear reader, the trouble of generating the NuGet package. In any event, I expect that a public release of Sitecore.Ship 0.4.0+ will be available soon.

The script supports basic authentication should you choose to host Sitecore.Ship or any dependent packages on a private feed. The script also supports search across multiple feeds. Thus, you could host a private build of Sitecore.Ship on a private feed, but pull dependent packages from public feed(s).

Version Testing

I've tested the install script against all versions of Sitecore 8 (initial release through update 4.) I've not tried the script with earlier versions of Sitecore, though I suspect it would mostly work. Depending upon demand or my own needs I may extend it to support earlier versions of Sitecore/Sitecore.Ship.

Happy deployments!

Wednesday, July 8, 2015

Basic Tips to Prevent Solr Downtime

If you've followed my series on installing Solr for Sitecore then you should have a shiny, new Solr instance somewhere in your environment happily indexing Sitecore data and returning results to queries. Hopefully, that never changes, but we all know that hiccups can happen. This post suggests a few things you can do to mitigate or prevent down-time.

Logging

If you find yourself troubleshooting, you'll be very glad to have Solr-specific logs to refer to. Given how easy this is to configure, you owe it to yourself to do so. Assuming you have the downloaded .zip from Solr:
  1. Copy the Jar files from  solr/example/lib/ext to Tomcat's lib/ folder.
  2. Copy properties file from solr/example/resources to Tomcat's lib/ folder.
All done! You will find your new Solr logs in the install path of Tomcat in the logs/ folder.

RAM

When dealing with Solr there are two kinds of RAM to consider. One is the amount of RAM dedicated to the Java heap and the second is OS disk cache. While I can't give specific guidance on how much RAM you should devote and where, I will provide some general advice and guidance.

Java Heap

To set the Java heap size is pretty straightforward matter once you understand the implementation details of Tomcat for your machine. Mainly, this means what version of Tomcat are you running and which OS do you use. I'll be covering Tomcat 8 as a Windows service. If you differ from me in one or more regards, don't despair. Most of what I say still applies to you, you'll probably need to look a little to find the equivalent spots to make your setting changes.

First, let's review the four different memory management parameters you may control
  • Xms - The minimum size of your heap
  • Xmx - The maximum heap size
  • XX:PermSize - Specifies the initial size allocated to the JVM at startup
  • XX:MaxPermSize - If necessary, up this maximum will be allocated to the JVM during startup

Most likely, you won't need to worry about XX:PermSize and XX:MaxPermSize unless you see errors like Java.lang.OutOfMemoryError: PermGen Space. Much more likely, you will want to control the bounds on your already-running heap through Xms and Xmx. If you are running Tomcat as a Windows service then this is as simple as filling in a text box. For example:


The above screenshot shows the equivalent of setting -Xms=256m and -Xmx=512m. Additionally, I elected to specify the XX:PermSize as 128MB.

As a final note on heap size, be aware that for heap sizes greater than 2GB, garbage collection can cause performance problems. Symptoms are occasional pauses in program execution during a full GC. This can be mitigated through GC tuning of your JVM or electing to use a commercial JVM.

Disk Cache

For disk cache, you would ideally have enough RAM to hold the entire index in memory. Whatever memory remains unused once the OS, running programs, and the Java heap have been satisfied is fair game for disk cache. Thus, if 12GB of RAM is unused, you could potentially fit 12GB of index data into memory before the OS is forced to start paging. In practice, you must use trial and error to find the right memory fit for your data and usage patterns.

Secondary Cores

Given that you have elected to use Solr, you probably treat search as a first-class citizen in your environment. If you aren't using secondary cores to provide data continuity during an index rebuild, you're simply doing it wrong. It helps that the process for configuring secondary cores is easy to follow.

Note: every time a rebuild occurs, the name values in the core.properties files for the two related cores will swap. This is normal behavior, of course, but can be horribly confusing if you aren't aware of it. I.e. don't just assume that the name of the core you are viewing matches the core's folder name in your Solr home directory!

Replication

This topic is actually quite broad and probably deserves a blog post or several all of its own. Nevertheless, we can at least imagine the base case of wishing to provision a second Solr instance that is slaved to a master instance. Fail-over will not be automatic although you could script it.
  1. Modify the core.properties file in your cores to set whether the core is a master or a slave.
    • On Master
      • enable.master=true
      • enable.slave=false
    • On Slave
      • enable.master=false
      • enable.slave=true
  2. Modify conf/solrconfig.xml file in each core to include a request handler for replication. Below is a snippet of XML you can use. Simply replace the "remote_host" and "core_name" in the snippet's XML with your environment's values. Note: the way I have constructed this snippet means you can apply it "as is" to any core on your master OR your slave instance. The trick I used was to associate the state of the "enable" property for the master and slave elements with the value of the enable.master and enable.slave properties from the core's core.properties file which you should have set in step 1. This makes your bookkeeping duties a little less painful, especially if you ever find yourself swapping the master and slave around.
What to do in the event your master goes down? Edit the master/slave properties in the core.properties file and change the ServiceBaseAddress used by Solr in the Sitecore.ContentSearch.Solr.DefaultIndexConfiguration.config file. You should also (as soon as time allows) edit the Replication handler XML appropriately: either change the URL or comment it out entirely.

Further Reading

Monday, July 6, 2015

PowerShell Sitecore Install Script

Update (4-17-2016): Here I discuss enhancements I've made to the script since last year as well as a video tour of the config file used by the script.


Download from GitHub.

I've been searching for a solution to automating Sitecore installations in any environment higher than my personal development VM--for that we already have SIM. I can be stubborn and exacting, sometimes to a fault, and while a manual install affords me complete control over an environment, it also is horribly time-consuming. Also, if I'm being honest with myself (I'm sure this plainly obvious to you) this process is mistake-prone.

Search for a Solution

The following are the three most prominent examples of existing solutions I looked at, but I looked at many more.

Sitecore Instance Manager

I've been using SIM for a while now to manage my Sitecore instances on my development box. It's a wonderful solution, but it's not suitable for a production environment without a lot of post-install intervention. I also looked at the console app for SIM. Alas, while it seems to extend SIM to the command-line, it does not allow for greater flexibility in how SIM installs a Sitecore instance.

Sitecore's Installer

Jeremy Davis had the very clever idea of deconstructing Sitecore's .exe installer to get at the underlying .msi file. He successfully identified all of the command-line switches the .msi accepts. I very nearly settled on this approach. After all, one would expect Sitecore's own installer to follow Sitecore's installation guideline's recommendations. It does a better job than SIM, but you are also rather constrained in some of your options and that was a deal breaker for me.

PowerShell Script

All-star Alex Shyba wrote a PowerShell script to automate his installs. His use case is the same as mine for SIM, however: he built the script to install development instances. Like the previous solutions discussed, concerns such as file system permissions, user mappings in SQL, using a domain account for the application pool identity, and CD-hardening are left as post-install exercises for a human.

Inspiration

Alex's script gave me the push I needed to write my own. My goal is to completely automate a production-ready Sitecore CM or CD server install. Once you run my script the only thing left to do is install your desired modules. Actually, let's take a minute to unpack that, because buried inside that sentence is a subtle point on my deployment philosophy, and it impacts the way I designed my Sitecore installer. I believe that any Sitecore change that can be managed through a .update package (or .zip module) should. For me, this includes managing changes like SwitchMasterToWeb, scalability, and web.config amongst many others. Thus, my over-arching design philosophy for an automated install is to do everything I would normally in SQL, IIS, the file system, and (yes...) the .config files but only enough to create a working instance and no more. Once the installer is done, the instance should be 100% ready for management via .update packages. That is my goal.

The Solution

I decided to make my script available on GitHub for a couple reasons.
  • I suspect and hope other will want to make use of it
  • Community feedback will help me improve it

Major Features

  • Install Sitecore with or without the databases.
  • Script sanity checks SQL and input validation prior to making any changes
  • Write output to the screen and to a log file.
  • Fine-grained control of the application pool identity (built-in or domain account)
  • Assign recommended file system permissions on web server.
  • Add application pool identity to recommended local groups on web server.
  • Create user mappings for login in SQL.
  • Install database files on any valid path or UNC
  • SQL Login used during install doesn't have to be the same account executing the script.
  • May specifiy a host name and port used for MongoDB
  • May supply a Solr base address
  • Choose to use SQL as a session state server
  • Many CD-hardening options

One limitation of the script today is I do not support choosing MongoDB as a session state server. My suspicion is that this would be a very easy change to make, and I will be including it soon. The script is strictly limited to automating the Sitecore install itself, not MongoDB or Solr. While it's not necessary, it would be a good idea to provisions those applications first if you plan to use them. Speaking of Solr, if you do plan to use it, then be sure to check out my other PowerShell script to change the search provider from Lucene to Solr.

Finally, I built this script to install Sitecore 8.0. I've briefly tested it with Sitecore 7.5 and it mostly works, but breaks on some assumptions about the existence of .config files like SwitchMasterToWeb.config.example and Sitecore.ContentSearch.Solr.DefaultIndexConfiguration.config.example. Even earlier versions of Sitecore would need some more adjustments (example: deal with with differences in databases.) Depending upon the level of interest expressed I will consider making the script compatible with prior Sitecore releases.

Tuesday, June 30, 2015

Unit Testing in Sitecore

Unit testing seems to be one of those topics that everyone generally agrees is a Good Idea, but when no one is looking it becomes fantastically easy to justify to oneself why for this project at this particular time it's ok to forgo unit tests.

My purpose here isn't to convince (guilt) you into doing unit tests. Rather, I'd like to demonstrate that actually implementing them can be trivially easy. Now, of course, anyone can write a unit test that is easy but does it add value? Well, that'll depend upon you, of course. My advice is target the hot spots in your code first and anytime you encounter a bug write a unit test that validates the bug is resolved. Aiming for 100% code coverage is admirable but don't let the perfect be the enemy of the good. Ok—enough preaching philosophizing!

Tools

First a word about tools. I favor Glass (version 3 for the purpose of this blog post) as my Sitecore ORM; this will have some ramifications for unit tests. As far as a unit testing framework, I have settled upon xUnit. Is this terribly important? Not especially. NUnit is quite popular and powerful. The designers of NUnit actually wrote xUnit. You can view their reasons for doing so here. Regardless of which framework you select, most of what I document here will still apply, the main difference is the syntax. For mocking, I have come to really like Sitecore.FakeDb. It's an amazing product. Add a NuGet package to your project and you suddenly have to power to run all of Sitecore's API without the need of a website. There are other Sitecore mocking tools out there, but I highly recommend this one. Finally, for a bit of syntactic sugar I suggest Fluent Assertions. Again, simply add the NuGet to your project and your assertion statements will read very nearly like English.

Some Lessons Learned

  • I don't need FakeDb for data mocking so long as I am working solely with Glass object. Since every Glass-mapped class is an implemenation of an interface, my mock test data can also simply implement that interface.
  • FakeDb is convenient, nonetheless, because it allows Glass's CreateFakeItem method to 'just work' without having to go the extra length of providing a testing database along with hand-(re)creating all of the config settings necessary to connect Sitecore's API layer to a data provider. This means that for very simple API calls you could avoid mocking with FakeDb and do it all through Glass. In practice, however, I find FakeDb to be so fast as to leave me wonder if there is any advantage to this.'
  • I can (if I want) cast from a FakeDb item to a Glass object. Nathanael Mann warns against this practice for performance reasons and because it blurs the line between unit testing and integration testing. In fairness, I am over-simplifying his thesis a bit, nonetheless, for me, the raw convenience of being able easily to mock Sitecore data is simply too powerful to ignore. As far as performance goes, once Glass's context has been created (~800ms hit) unit tests involving Glass run in less than 10ms even when casting. 10 seconds per 1000 tests? I can accept that.

Everybody Loves an Example


namespace MyPOCO.Tests.Data.Domain
{
    public class My_POCO_Tests
    {
        public class DoesQueryStringMatchMethod
        {

            public static DbTemplate GetMyPOCOTemplate()
            {
                return new DbTemplate(IMy_POCOConstants.TemplateName, IMy_POCOConstants.TemplateId)
                {
                    new DbField(IMy_POCOConstants.Query_String_Value_To_MatchFieldName, 
                        IMy_POCOConstants.Query_String_Value_To_MatchFieldId)
                };
            }
             
            [Fact]
            public void RequestedUrlHasUpperCaseValues()
            {
                //arrange
                string requestedUrl = "http://www.google.com?foo=bar&color=RED";
                GlassMapperContext.CreateContext();
                using (var db = new Db
                {
                    FakeDbHelper.GetMyPOCOTemplate(),
                    new DbItem("test", ID.NewID, IMy_POCOConstants.TemplateId)
                    {
                        {IMy_POCOConstants.Query_String_Value_To_MatchFieldName, requestedUrl}
                    }
                })
                {
                    global::Sitecore.Data.Items.Item home = db.GetItem("/sitecore/content/test");
                    My_POCO poco = home.GlassCast<My_POCO>();

                    //act
                    bool result = poco.DoesQueryStringMatch(requestedUrl);

                    //assert
                    result.Should().BeTrue();
                }
            }
        }
    }
}

So, what does this code demonstrate? It shows a Glass-mapped object that has a method I wish to unit test. The method is named DoesQueryStringMatch. Presumably, the method compares the requested URL against a field value and returns a boolean. Of course, a more realistic and more useful test would be against a method that had a more complicated job to do, but for purposes of illustrating the technique we'll stick with a contrived example.

 I could have mocked my Glass object without the need for FakeDb, and I do need to create my Glass context (that's the GlassMapperContext.CreateContext() method call.) Once that work is done, however, I am free and clear for all further unit tests where I may have need to test against Sitecore items—example: an action for the rules engine. I leverage the fact that Glass maintains constants about my template and its fields. Necessary? No, but very useful if I have to create an item with a complicated structure. Creating the Glass context is simple enough. I just replicate the code called in the Start() method of GlassMapperSc.cs.


Friday, May 22, 2015

MSBuild and TDS

I recently had a need to get continuous integration working for a project that uses Team Development for Sitecore (TDS)—most of us do right? :) While some of this blog post will deal specifically with creating a build definition in Team Foundation Server (TFS), the vast majority of this article applies to any software that uses MSBuild under the hood: TeamCity, Jenkins, CruiseControl, etc.
 
The wrinkle in my requirements was that I could not install TDS on the build server. There's already a very helpful resource on this topic, but I did find I had to do things slightly different in my environment. Additionally, I also made it a goal to remove the SlowCheetah dependency (I make use of xml transformations) from my build server. Finally, I ran into a couple of other small roadblocks that I thought I might as well document here while I was at it.

TDS

As I said, Mike Edwards has an immensely useful article that shows how to avoid installing TDS on your build server. The only things I will add are where I diverged from his steps. For clarity, Mike added a folder called TDSFiles at the root of his solution. I added a folder called MSBuild Support Files with a child folder called TDS.

  1. The HedgehogDevelopmentSitecoreProject.targets file has many references to the HedgehogDevelopment.SitecoreProject.Tasks.dll. For each one of these you need to modify the path. In my case, the correct path is no path at all. This was because (I assume) TFS used the working directory of the .targets file itself as a starting location—the .targets file and the DLL live side-by-side.


  2. In the same .targets file you will also need to modify the paths of the TdsService.asmx and the HedgehogDevelopment.SitecoreProject.Service.dll. Here is a screenshot of my modifications.


SlowCheetah

After corresponding with Hedgehog's Charlie Turano, I decided to eliminate MSBuild's dependency on SlowCheetah. This step is only necessary if you do not supply the DLLs and .targets files to MSBuild. One easy way of doing this is to simply include the "packages" folder from NuGet in source control. This guarantees that MSBuild will be able to make use of the files. In fact, this is how my solution was already set up. Nonetheless, TDS is perfectly capable of doing XML transformations during the build. I want to be ready should a future release of TDS completely replace SlowCheetah (a possibility since SlowCheetah's developer has said he will no longer maintain it.)

This is very easy to do. Simply comment out the following line in any .csproj file that uses SlowCheetah


Some Miscellaneous Issues

  1. I encountered another .targets related issue. This time it was:

    The imported project "C:\Program Files (x86)\MSBuild\Microsoft\VisualStudio\v11.0\WebApplications\Microsoft.WebApplication.targets" was not found. Confirm that the path in the <Import> declaration is correct, and that the file exists on disk.

    What's happening? Inside the .csproj file there is a variable $VSToolsPath getting set that ends up being used by MSBuild to resolve the path of the Microsoft.WebApplication.targets. You could modify the .csproj to prevent this behavior, but it's much easier to simply use a command-line switch like so:

    msbuild myproject.csproj /p:VisualStudioVersion=12.0.

    If you are using TFS then the fix is just as easy: in your build definition on the process tab set your MSBuild Arguments


  2. I was receiving a post-build error:

    API restriction: The assembly 'file:///D:\Builds\6\XXXXXXXXXX\XXX-TestBuild\Binaries\_PublishedWebsites\TDS.MyProject\bin\MyProject.Tests.dll' has already loaded from a different location. It cannot be loaded from a new location within the same appdomain.


    The full explanation of what is happening is here. The resolution is again very simple. In the build definition make sure you do not recursively match all test DLLs:

Thursday, May 21, 2015

Create a Reverse Proxy Controlled By Sitecore

Reverse proxies can be an incredibly useful technology in your Sitecore implementation depending upon your needs. The basic idea is that a reverse proxy forwards requests on to other servers on behalf of the requesting client, sort of like a traffic cop. The responses from the servers behind the reverse proxy are then returned to the requesting client. This can be done in such a way that is completely transparent to the end-user.

The Use Case

So why bother? Well, as Grant Killian suggests over on his blog at least two scenarios come to mind (I'm sure all you very smart folks could undoubtedly name more!) I want to focus on the case of a reverse proxy sitting between the Internet and a set of web servers that includes one or more legacy web servers and a Sitecore instance.

I've kept the conceptual diagram above simple (no load-balanced servers, firewalls, cache servers, etc.) but the technique readily applies to an enterprise ecosystem. The basic strategy is as follows:

  1. A user tries to browse a page (perhaps one they have bookmarked) e.g. http://company.com/foobar.php
  2. The reverse proxy receives the request and "asks" Sitecore where to route the request
  3. Sitecore tells the reverse proxy if it can handle the request and, if so, what the URL should be.
  4. The reverse proxy rewrites the request and forwards it. For example, if Sitecore responded positively to the reverse proxy our URL might be transformed to http://sitecorecd.company.com/foo/bar
  5. Sitecore or the legacy server responds to the page request
  6. The reverse proxy rewrites the response so that the end-user is unaware the page they see was came from a different server than the one they contacted.

The payoff with this scenario is we can now manage incremental content migrations from legacy servers to Sitecore servers without any disruption to end-user experience. Bookmarks, campaign emails, RSS feeds, Google search result rankings....all of it will happily continue on as always regardless of whether the legacy web server or Sitecore actually answers the HTTP request. Powerful stuff! This technique is especially useful for clients that have a very large inventory of content and cannot or are unwilling to migrate everything all at once.

The Solution

The first order of business is setting up a reverse proxy in IIS. The goal is to have a dedicated web site in IIS as the reverse proxy. To do that we need to install the Application Request Routing (ARR) extension. Once ARR is installed we'll need to do perform the following configuration steps

  1. Open IIS Manager and select the server node. Double click on the Application Request Routing Cache icon.

  2. In the right-hand pane click Server Proxy Settings.

  3. Check the Enable proxy setting and uncheck the Reverse rewrite host in response headers option.

  4. Set the Response buffer and Response buffer threshold values for 8092 and then click Apply. The reason for this I discovered through the school of hard knocks: some pages were mysteriously causing YSODs. After digging through logs (more on that later) we found that the response from the server was literally truncated. The page was large enough that it was overflowing the response buffer and causing it to flush with only a part of the overall page.


Now that ARR is installed and configured at the server level we need to turn our attention to the reverse proxy site. Here is the secret sauce of our solution: rather than merely write in some rules for routing in the web.config we are going to create our own custom Rewrite Provider. This will allow us to execute our own code during the runtime of the reverse proxy. I followed this guide to develop my own custom provider; it should get you up and running.

So what does my rewrite provider do? At its heart it's just a very simple URL resolver. The provider is rather dumb (and it should be!) We want the reverse proxy to do as little processing as possible.

  1. First make a request to Sitecore to see if the requested page (rewritten with Sitecore's host header) can be served, i.e. does the web request return with a response status code < 400.
  2. If that fails, the reverse proxy contacts a web service that knows how to map a legacy URL onto a Sitecore URL. Thus a URL like /news/article.php?id=foobar in the legacy system can be mapped onto /news/articles/foobar for example.
  3. If steps 1 and 2 fail, then the request is routed to the legacy server.

You may be wondering if all of that still sounds like too much work given that every request passes through the reverse proxy. Fortunately ARR has very good built-in caching, so in practice, your most requested pages (and resources) will not be processed in code continuously.

Closing Thoughts

Beyond what's already been covered, I recommend you consider the following:

  1. You need some kind of logging strategy. I write to the event logs from the reverse proxy and Sitecore's logs during the runtime of Sitecore (for example, the URL mapping web service.)
  2. Perform load testing. ARR is remarkably good OOTB with its cache settings, but better to test and know than simply assume.
  3. Think ahead about sessions and how you will deal with them.
  4. Redundancy. Our solution uses more than one reverse proxy. As a side-note with my implementation, if Sitecore itself goes down, the reverse proxy will continue to function. All requests would simply go to the legacy server. Eventually this behavior may become undesirable, but early in a project's lifetime this can be a real selling point.
  5. You definitely need to create some outbound rewrite rules in your reverse proxy's web.config to deal with:
    1. Rewriting relative links in the response HTML
    2. Rewriting the Location in the response Header when the status code is a 3XX (a redirect) and the host name is your backend server. This will prevent the end-user's browser being redirected to http://legacy.company.com/foobar rather than http://company.com/foobar
  6. You should absolutely turn on Failed Request Tracing Rules. This is the logging function I discussed earlier that proved invaluable in diagnosing and resolving issues during development

Monday, April 27, 2015

SwitchMasterToWeb Woes

Scenario: You are using Sitecore 8—I think this also applies to 7.5—and have enabled the SwitchMasterToWeb.config. You now see see an exception related to 'master' database. For example:

  • Could not find configuration node: contentSearch/indexConfigurations/indexUpdateStrategies/syncMaster


Cause: Sitecore patches files found in the \Include folder first and then recursively patches all files found in sub-folders of \Include. In all cases, Sitecore follows alphabetical order when deciding which folder or file to examine next. This means that the SwitchMasterToWeb.config file placed in \Include will be merged before config files found in sub-folders. Some of those config files are for indexes and those index try to use the syncMaster strategy.

Resolution: Place the SwitchMasterToWeb.config file in a sub-folder like "zzzMustBeLast" and reload your site!

Saturday, April 25, 2015

NuGet Tip: Automatically Set 'Copy Local' Property to False

This is probably slightly off the beaten path for some of the Sitecore community, but I suspect quite a few of us use NuGet. Furthermore, of those that do, some not only consume but produce NuGet packages. One annoyance I've had is the good ol' Copy Local property of an assembly reference.


When this property is set to true, the assembly will be copied to the output directory of your project. This can be problematic. For example, with TDS, when you build your solution the output directory of your web application project gets copied to your Sitecore instance. Ideally, you don't want to overwrite or add DLLs to your Sitecore instance by accident. While you can prevent this from happening by maintaining an exclusion list in TDS, it's easy to forget.


How does this relate to NuGet packages?

Usually when you add a new package one or more DLL references are added to your project(s) and almost invariably the Copy Local property will be set to true. If you create your own NuGet package and wish to prevent this, here is a PowerShell script that will do the trick:


Simply add/overwrite the Install.ps1 script found in the "tools" folder of the NuGet package. Voila!

Friday, April 3, 2015

How to Map Sitecore Rules Field with Glass and TDS

tl;dr Copy lines 246 and 247 from here. Regenerate your Glass classes. 

Today a colleague asked how to map the rules field from Sitecore with Glass Mapper using TDS and T4 templates. It just so happens that I'd recently worked on this problem, and I thought I would share it with others here.

The basic issue is that the glassv3item.tt template doesn't know how to deal with the Rules field. The GetGlassFieldByType method is responsible for assigning a type to mapped field. It does this with a switch statement. Our rules field is falling all the way through to the default case which maps the field to an object. We need to add a case for the field.Type value when it equals "rules".

What type will we map to though? On first pass I thought something like XDocument would make a lot of sense. Problem is that doesn't work. The value is always null. I took a look inside the Glass.Mapper.Sc.dll at what I believe is the code responsible for returning a value. It looks to me like the mapping code isn't fully implemented, and Glass relies on a generic method that simply returns a string value.


Not a big deal. We can work with this.

After you've modified the T4 template and regenerated your Glass classes, you should have a mapped property on your class of type string. I've found for my purposes this is perfect for my needs, but that didn't stop me from extending my partial class with an XDocument property...just in case.

public partial class GeneratedClass
{
    public XDocument RuleAsXDocument
    {
        get { return XDocument.Parse(this.Rule); }
    }
}

Thursday, April 2, 2015

A SIMple Error

While installing Sitecore Instance Manager (SIM) I made a silly mistake that gave me pause. I figured I would document it here in the hope it might help someone else might benefit.

The final step in the installation wizard attempts to do a permission check. It is labeled as "File Systems permission" and, indeed, it does check this and even provides a handy "Grant" button if SIM does not have the permission it thinks it needs.


What can be a bit confusing is that even after seeing the success message above you still encounter an error dialog complaining that "You probably don't have necessary permissions set. Please try to click 'Grant' button before you proceed."


What's happening? Under the hood, SIM isn't just checking the file system, it is also trying to create a test database in SQL. If the SQL login SIM uses doesn't have the right to create a database, then SIM will fail this "file system" check with (in this specific case) a misleading error. The fix is simple, make sure your SQL login has the dbcreator role or higher. Thus my silly mistake: Of course SIM needs the ability to create databases why didn't I think of that sooner....DUH! :)


Rerun the last step and enjoy the wonders of SIM!

Saturday, March 28, 2015

On Second(ary) Thought...

Recently I posted my thoughts regarding the proper ratio of Solr cores to Sitecore indexes. In it, I mentioned the need to double the number of cores to support the SwitchOnRebuildSolrSearchIndex feature. It turns out, this isn't quite right. Creating a secondary core for the analytics index does no good and should be avoided.

You'll want to avoid a secondary core for the analytics index because trying to use one results in exception. The analytics index has an extra "group" parameter, and Sitecore cannot find a matching constructor. The SolrSearchIndex class allows for the group parameter but the SwitchOnRebuildSolrSearchIndex does not.

Why is this? As Adam Conn explains, the types of crawlers responsible for maintaining the analytics index are observers of data. This means that the crawler is notified when data is available and then passed that data. Therefore, rebuilding the analytics index would result in an empty index unless you rebuild the reporting database so that the analytics crawlers may observe (and index) the data. This is the reason why the UI doesn't provide the option of rebuilding the analytics index.

Tuesday, March 24, 2015

Solr + Glass = Castle Windsor Crashers?

(I know the title isn't technically true...don't judge me!)

I think it's safe to say most of us Sitecore developers are using some form of ORM these days, right? ...Right? :)

Of course you are, and – most likely – that means you are using Glass Mapper. Probably, you are also using Castle Windsor as your choice of Inversion of Control. You could use some other IoC, but there's a NuGet package that makes incorporating Castle Windsor + Glass into your Visual Studio solution quite easy.

So what if you read my series on Solr and were inspired to use it for Sitecore? Solr also requires an IoC. As I mentioned here, you may choose from Castle Windsor, AutoFac, Ninject, StructureMap, and Unity. It seems only natural to stick with the same IoC as Glass. Common sense says don't add more moving parts than necessary.

And this is why common sense isn't always common or sensible. The moment you deploy your Glass dependent (and thus Castle Windsor dependent) code to your Sitecore instance, you are going to be treated to some ugly YSODs. The issue is that Glass wants to use a higher version of Castle Windsor (3.2) than your Solr-enabled Sitecore instance; it wants version 3.1.

Luckily the fix is relatively painless. We are going to instruct .NET to redirect bindings of earlier versions of Castle.Core and Castle.Windsor to our later version. All you need to do is add the following section to your web.config:

Saturday, March 7, 2015

Friday, March 6, 2015

A Solr Core-nucopia?

[N.B.: If you haven't already, check out my series of posts (1, 2, and 3) that walk through installing Solr for Sitecore.]

Given that there isn't yet a search scaling guide for Sitecore 8.0, the current, best authoritative source of guidance is the Sitecore Search Scaling Guide for 7.5. There is an interesting line in the guide that recommends creating "separate cores for each Sitecore index." This was necessary to avoid inconsistent and unexpected results.

While digging through the release notes for Sitecore 8 update 1 I found a good, technical description of the risk:

When two indexes were configured to use the same SOLR core, it was impossible to differentiate the index data between the indexes. As a result, index data related in one index would override the index data in the other index. This has been fixed so that the _uniqueid index field value has been extended with information about the index name. (426743)

Out of curiosity I decided to validate the fix. Here is a query from one of my Solr cores connected to a Sitecore 8 update 2 instance (a big thumbs-up to Solr's built-in admin tool!)


Let's breakdown the taxonomy of this _uniqueid:

  1. sitecore://<database name>/<item id>?lang=<language name>&ver=<version number>&ndx=<index name>

Clearly, the index name is now a part of the key! Does this mean you can disregard the advice in the Search Scaling Guide? In a word, yes. A more important question is, "Should you?" Well, probably not. Here are some reasons why:

  1. Any single Sitecore index (Solr core) rebuild is less expensive since there is less data. Thus, the rebuild is quicker.
  2. When reviewing statistics about a core in Solr's core admin, facts about the core such as the number of documents easily translate to facts about the Sitecore index.
  3. Probably most important of all, it's possible to tune the cache and core's settings as necessary per Sitecore index. Undoubtedly, usage patterns will vary per Sitecore index. So should the strategies you implement to tune the Solr core responsible for that Sitecore index.

Update (3-8-2015): In Sitecore update 2, one Solr core was removed and two were added. I updated the paragraph below to reflect this.

Keep in mind, these advantages do come at a cost. There will be some amount of overhead incurred per core. Also, there is the management headache of maintaining many cores. As of Sitecore 8 update 2 there are 13 indexes for a vanilla install. If you want to take advantage of the SwitchOnRebuildSolrSearchIndex feature (while an index rebuilds, Sitecore can still return search results for that index) then you will need to add an additional core for each Sitecore index that uses this feature. That is a possible 26 25 (see here for an explanation why the total number changed) cores to manage!

I'm interested in other people's opinions on this topic. Let me know what you all think.

Saturday, February 28, 2015

Sitecore 8 + Solr (part 3/3): Configur-ageddon

So far in this series we have installed Tomcat and Solr. Hopefully it has been a relatively easy process. Unfortunately, I can't promise today's post will be as easy. I've tried to balance making the configuration process as pain-free as possible, while not shielding anyone from the details that tripped me up. My goal is to take (all?) the guesswork out of this process. Let me know how I did!

[N.B.: As I was finishing up this final post I saw that update 2 for Sitecore was released. A quick perusal of the release notes leaves me feeling fairly confident that these instructions -- created with Sitecore 8 update 1 in mind -- should still be valid for update 2. No doubt I will soon need to upgrade my Sitecore environments to update 2 in the near future. Rest assured any issue(s) I encounter I will document here.]

Update (3-3-2015, 3-8-2015): As promised, I have updated this guide to comply with Sitecore 8 update 2. This means that if you want to upgrade from update 1, then you will need to create a couple of new cores and delete an old one (see step 6) and replace a DLL (see step 9). If you are starting fresh from update 2, then don't worry about any of this and dive right in!


  1. Stop the Tomcat service.
  2. Go to the root of your Solr instance, in my case, D:\solr. We need to modify the "collection1" directory to serve as one of the cores (folders with config files and index data) required by Sitecore.
    1. Rename the folder to "sitecore_analytics_index"
    2. Inside the folder you will find a file called “core.properties” which you may edit with a text editor. You need to change the “name” value to the name of your core. For example, when I create the “sitecore_analytics_index” core, then I will edit the “core.properties” file to have the value name=sitecore_analytics_index


  3. Start the Tomcat service and visit the Solr administration page. You may need to reload your browser page if it was already up. Click on the “Core Admin” menu item. If you modified the old “collection1” core correctly you should now see a sitecore_analytics_index core.


  4. Stop the Tomcat service. Now we need to fix the schema of our “sitecore_analytics_index” core, otherwise Sitecore cannot parse the xml correctly. Edit the file at \sitecore_analytics_index\conf\schema.xml according to Sitecore’s knowledge base article: https://kb.sitecore.net/articles/227897. Don’t forget to define the field type for pint since we are using a version of Solr later than 4.9! Start Tomcat and reload the Core Admin page.
  5. Next we must generate a new, Sitecore-specific schema. Sitecore provides a tool for this. Navigate to the Control Panel of your Sitecore instance. Look for the “Generate the Solr Schema.xml file” link and click it. Provide a path for the source and target files (they can’t be the same file.) Once you have generated your new schema, replace the old schema with it. Restart the Tomcat service and make sure the core loads correctly.
  6. A vanilla install of Sitecore 8 update 2 requires 13 cores to work correctly. So far we have one, but don’t despair, now that we have a generated a schema this process is much easier.  Essentially, we are going to use our sitecore_analytics_index core as a template to create the others. To do this:
    1. Copy the sitecore_analytics_index folder.
    2. Repeat steps 2a and 2b for each copy.
    3. When you are done, your Solr home folder should contain the following cores


    4. If you have done everything correctly you should be able to restart Tomcat and see all the cores listed above on the Core Admin page.
  7. Update (3-7-2015): I decided to create a PowerShell shortcut for this step. Save yourself time!

    Still with me? Hang in there, we are halfway home! Next, we must tell Sitecore to start using Solr instead of Lucene. This is done by appending or removing “disabled” as an extension of a configuration file’s name.
    1. Config files to DISABLE:

      \App_Config\Include\Sitecore.ContentSearch.Lucene.DefaultConfigurations.config.disabled
      \App_Config\Include\Sitecore.ContentSearch.Lucene.Index.Analytics.config.disabled
      \App_Config\Include\Sitecore.ContentSearch.Lucene.Index.Core.config.disabled
      \App_Config\Include\Sitecore.ContentSearch.Lucene.Index.Master.config.disabled
      \App_Config\Include\Sitecore.ContentSearch.Lucene.Index.Web.config.disabled
      \App_Config\Include\Sitecore.ContentSearch.Lucene.Indexes.Sharded.Core.config.example (left as is)
      \App_Config\Include\Sitecore.ContentSearch.Lucene.Indexes.Sharded.Master.config.example (left as is)
      \App_Config\Include\Sitecore.ContentSearch.Lucene.Indexes.Sharded.Web.config.example (left as is)
      \App_Config\Include\Sitecore.Marketing.Definitions.MarketingAssets.Repositories.Lucene.Index.Master.config.disabled
      \App_Config\Include\Sitecore.Marketing.Definitions.MarketingAssets.Repositories.Lucene.Index.Web.config.disabled
      \App_Config\Include\Sitecore.Marketing.Definitions.MarketingAssets.Repositories.Lucene.IndexConfiguration.config.disabled
      \App_Config\Include\ContentTesting\Sitecore.ContentTesting.Lucene.IndexConfiguration.config.disabled
      \App_Config\Include\FXM\Sitecore.FXM.Lucene.Index.DomainsSearch.config.disabled
      \App_Config\Include\ListManagement\Sitecore.ListManagement.Lucene.Index.List.config.disabled
      \App_Config\Include\ListManagement\Sitecore.ListManagement.Lucene.IndexConfiguration.config.disabled
      \App_Config\Include\Social\Sitecore.Social.Lucene.Index.Master.config.disabled
      \App_Config\Include\Social\Sitecore.Social.Lucene.Index.Web.config.disabled
      \App_Config\Include\Social\Sitecore.Social.Lucene.IndexConfiguration.config.disabled


    2. Config files to ENABLE:

      \App_Config\Include\Sitecore.ContentSearch.Solr.DefaultIndexConfiguration.config
      \App_Config\Include\Sitecore.ContentSearch.Solr.Index.Analytics.config
      \App_Config\Include\Sitecore.ContentSearch.Solr.Index.Core.config
      \App_Config\Include\Sitecore.ContentSearch.Solr.Index.Master.config
      \App_Config\Include\Sitecore.ContentSearch.Solr.Index.Web.config
      \App_Config\Include\Sitecore.Marketing.Definitions.MarketingAssets.Repositories.Solr.Index.Master.config
      \App_Config\Include\Sitecore.Marketing.Definitions.MarketingAssets.Repositories.Solr.Index.Web.config
      \App_Config\Include\Sitecore.Marketing.Definitions.MarketingAssets.Repositories.Solr.IndexConfiguration.config
      \App_Config\Include\ContentTesting\Sitecore.ContentTesting.Solr.IndexConfiguration.config
      \App_Config\Include\FXM\Sitecore.FXM.Solr.Index.DomainsSearch.config
      \App_Config\Include\ListManagement\Sitecore.ListManagement.Solr.Index.List.config
      \App_Config\Include\ListManagement\Sitecore.ListManagement.Solr.IndexConfiguration.config
      \App_Config\Include\Social\Sitecore.Social.Solr.Index.Master.config
      \App_Config\Include\Social\Sitecore.Social.Solr.Index.Web.config
      \App_Config\Include\Social\Sitecore.Social.Solr.IndexConfiguration.config


  8. So I know that last step was pretty tedious, but if you've made it this far then the rest will be easier. Download the Solr Support Package from Sitecore and extract the contents of the zip file.
  9. Copy the following DLLs from the Solr Support Package into the \bin folder of your Sitecore Instance [N.B.: Castle Windsor is my Inversion of Control preference as Glass also uses it. Aside from Castle Windsor, Sitecore supports AutoFac, Ninject, StructureMap, and Unity.]:

    • Castle.Facilities.SolrNetIntegration.dll
    • Microsoft.Practices.ServiceLocation.dll
    • Sitecore.ContentSearch.Linq.Solr.dll
    • Sitecore.ContentSearch.SolrProvider.CastleWindsorIntegration.dll
    • Sitecore.ContentSearch.SolrProvider.dll
    • SolrNet.dll

      Update (3-3-2015): If you are upgrading from Sitecore 8 update 1, then you only need to replace Sitecore.ContentSearch.SolrProvider.XXXXXIntegration.dll with the latest version from the Solr Support Package. All other DLLs remain unchanged.

  10. Download the Nuget package for Castle Windsor. Unzip the package by renaming the extension from .nupkg to .zip and extracting its contents. Copy the Castle.Windsor.dll from \lib\net40-client to the \bin folder of your Sitecore instance.
  11. Repeat step 10 for the Castle.Core Nuget package. Copy the Castle.Core.dll from \lib\net40-client to the \bin folder of your Sitecore instance.
  12. Since we are going to use IoC, we need to make our Sitecore instance aware of it by replacing the Application directive in the global.asax file with the following:

    <%@Application Language='C#' Inherits="Sitecore.ContentSearch.SolrProvider.CastleWindsorIntegration.WindsorApplication" %>

  13. In order for Sitecore to talk to Solr, we need to give it a URL. This setting is maintained in the Sitecore.ContentSearch.Solr.DefaultIndexConfiguration.config file (remember, your address may differ from mine):

    <setting name="ContentSearch.Solr.ServiceBaseAddress" value="http://tomcat:8080/solr" />

  14. SOOO CLOSE! At this point, you are ready to test how badly you have broken your Sitecore instance! With any luck, when you browse to your Sitecore site you won't encounter any yellow screens of death. If you see a YSOD complaining about "Connection error to search provider [Solr] : Unable to connect to [http://tomcat:8080/solr]" then you are likely either missing a core or made typo when creating one. Assuming you are error free, the final step is to re-index. Go to the Control Panel and look for the "Indexing manager" link. Select all indexes and click the "Rebuild" button.
  15. Drink a beer; you deserve it!

Friday, February 27, 2015

Sitecore 8 + Solr (part 2/3): Install Solr

In part one of this series, I covered the installation of Tomcat. Now we are ready to get an instance of Solr up and running.

  1. Download Solr 4.10.3 from http://lucene.apache.org/solr/downloads.html. Since we are installing on a Windows machine, you will want to get the .zip file version of the download.
  2. Extract the contents of the .zip to a temporary location of your choice.
  3. Find the \dist folder in the extracted solr-4.10.3 directory. Rename the solr-4.10.3.war to solr.war and copy the file to the Tomcat’s \webapps folder. The path in my environment was C:\Program Files\Apache Software Foundation\Tomcat 8.0\webapps.
  4. Create an empty Solr home folder. This will be the permanent place of residence on your machine for your Solr instance. For example, D:\solr is where I put my Solr instance.
  5. Find the \example\solr folder in the extracted solr-4.10.3 directory. Copy the contents of \example\solr to the empty Solr home folder you just created in step 4.
  6. Find the \example\lib\ext folder in the extracted solr-4.10.3 directory. Copy the contents of \example\lib\ext to Tomcat’s \lib folder. The path in my environment was C:\Program Files\Apache Software Foundation\Tomcat 8.0\lib.
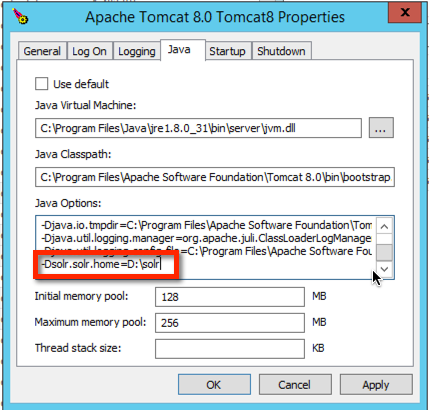
  7. Set the home directory for Solr in Tomcat. This is done by adding a new Java option with the Monitor Tomcat program. In my case, the option was -Dsolr.solr.home=D:\solr


  8. Stop/start Tomcat and try browsing to your Solr instance. For example, http://tomcat:8080/solr.


In the third and final post of this series I'll show you how to get Sitecore and your shiny, new Solr instance working together.

Thursday, February 26, 2015

Sitecore 8 + Solr (part 1/3): Install Tomcat

This is part one of a three-part series intended to guide you step-by-step through the process of making Sitecore 8 and Solr work together. There are some good resources on the Internet, but none of them are a soup-to-nuts walkthrough, and unfortunately there are many pitfalls along the way especially if you are unfamiliar with tools like Apache Tomcat or Solr -- even if you are, the current state of Sitecore's documentation for working with Solr isn't complete for Sitecore 8. I'm sure that will change soon! :)

So, in this first post our goal is to get Apache Tomcat running on a Windows machine installed as a Windows service. Onwards!

  1. Since Solr and Tomcat both require the Java Runtime Environment (JRE) to run, we'll need to start with installing the correct JRE for our machine. This guide uses jre-8u31-windows-x64.exe.
  2. Download and install the Windows Service Installer for Tomcat. This guide uses version 8.0.18 of Tomcat, but you can safely use a more recent version. There are a few decisions to make with the installation wizard. You may choose to install the Host Manager component; this will expose a host manager gui to Tomcat’s built-in administration page.


  3. The default port used by Tomcat is 8080 (used to be 8983) but you may elect to use some other port. Don’t choose port 80 unless you are prepared to tinker with IIS to re-route requests meant for Tomcat to Tomcat; it’s not really worth the effort. Nevertheless, here is a link to a helpful resource: https://confluence.atlassian.com/display/JIRA/Integrating+JIRA+with+IIS.


    If you do not supply an optional user name and password, then you will need to manually edit the conf/tomcat-users.xml file (found under the Tomcat install path) in order to manage Tomcat from the built-in administrative web site. If you do find yourself editing the tomcat-users.xml file, don’t forget to stop-restart Tomcat for those changes to take effect. You can do this with the Monitor Tomcat tool:


  4. Test the Tomcat installation by pointing your browser to http://localhost:8080 assuming that you used port 8080 as your HTTP Connector Port.


  5. By default, the Tomcat Windows service startup type is “Manual.” This means that after rebooting your machine you will need to remember to manually restart the Tomcat service. Change the Tomcat Windows Service startup to “Automatic.”


  6. As a final, optional step, you might elect to add an alias to Tomcat so that the website can be accessed using something other than localhost. For example, you could add the tag <Alias>tomcat</Alias> to the conf/server.xml file. Don't forget—if you use an alias then make sure you either update your DNS server to use that alias or edit your hosts file in Windows. :)


At this point you should have a working Tomcat installation that will be available even after a reboot of your machine. In the next post of this series we will tackle installing Solr on top of Tomcat.

Sunday, February 1, 2015

MongoDB University Course for .NET Developers

Given that MongoDB is an integral part of Sitecore's xDB architecture starting with Sitecore 7.5, it stands to reason that our clients and colleagues will look to us, the Sitecore experts, for guidance. So what can us mere mortals who aren't already NoSQL experts do to prepare ourselves? Enroll in a course taught by NoSQL experts, of course!

Now, I know what you might be thinking, "Online courses are of limited value." And, normally, I'm right there with you. The quality of the material on offer from MongoDB University is truly worth the investment of your time, however. The only catch was none of the courses on offer were tailored for .NET developers. Last year I decided to dive in anyway with the Node.js course -- it's excellent, of course -- but just recently MongoDB University has expanded their course catalog with something for us .NET folks! Be prepared to devote several hours a week, and in return you will get a solid foundation on which to build solutions ranging from CRUD, to schema design, to performance tuning and application engineering.

Solr 4.8 and Higher with Sitecore - Schema Issue Resolved

Dan Solovay has a great blog post that details how to setup Solr with Sitecore 7. One potential problem stood out though: Sitecore didn't play well with Solr 4.8.x or higher due to an assumption Sitecore made about Solr's schema.

If you, like me, read this and had reason to hesitate then I say worry not! Sitecore has provided a solution that will allow you to deploy Solr 4.8 and later to your environment. In a nutshell, the fix is to modify the Solr's schema.xml file.

From the kb article:

  1. Make the following changes in the default schema.xml file shipped with Solr:
    • enclose all <field> and <dynamicField> elements in the <fields> tag.
    • enclose all <fieldType> elements in the <types> tag.
  2. Pass the modified schema.xml file to the Build Solr Schema Wizard to add the Sitecore specific specific configuration.
  3. Put the resulting file to the configuration folder of the Solr core.
  4. If you use Solr 4.9 or later, ensure that the following field type is defined in the schema.xml file:
  5. <fieldType name="pint" class="solr.IntField"/>
  6. Reload the core to apply schema changes.